Sorry for the late update! I’m the worst at keeping this blog updated but here we go… let’s talk about the van rebuild!
In late April, Bryan and I returned to Green Bay from California and began re-building our van. We ditched our travel trailer for good and are now full-time living out of van. Rebuilding the van included removing everything but the flooring and the main interior frame.
Our main criteria for the rebuild was:
- Two dedicated work stations
- Permanent bed area
- Solar capabilities to run our workstations. (Be 100% Off-Grid)
- Install a sliding door window & roof fan
Our initial van build was meant for weekend expeditions. We had a bench/bed combo that needed to be deployed/put away each day and most of our storage was just some storage area under the bed with no organization. In the beginning of 2018, we began living out of the van to determine what would we need in order to be comfortable for full-time living. We took lots of notes and came up with a different layout.

Our initial build out. Van 1.0
While Bryan took care of the entire electrical system, I armed myself with my handy drill & jigsaw and began the build!
Solar Energy:
Our total battery bank is 600ah (3x 200ah batteries). We have 400w of flexible solar panels securely attached to our roof (4x 100w solar panels). In addition to the panels, we also have a battery to battery charger that allows us to charge our batteries with the alternator while driving. This is particularly handy for cloudy days and since we drive every couple of days, we can be certain our batteries are always topped off. If our system would ever fail us, we also have a shore power plug.
Bed:
Bryan’s a tall guy and our van is the shortest Transit on the market. If you do the math, that doesn’t leave us with much room for anything else. For this build, we decided to have a permanent bed structure with lots of organized storage underneath. 1/3 of that storage is being used by our electrical system but that’s okay, we don’t own much beside our backpacking gear!
We also went front to back bed because Bryan’s too tall for sleeping side to side. For our next build (Yes, we are thinking about building another van in a few years!) we think we’ll get set up with van flares that will give us 80in width. Perfect to set a bed side to side and gain more room.
Kitchen:
Our last kitchen counter worked great but we had to incorporate a fridge in our system. We opt to ditch a cooler that we had to constantly fill with ice and made our food soggy and go for a DC fridge. We now use the Dometic 32. It gives us plenty of room for food. It slides right inside our kitchen cabinet and doesn’t take up much room or energy.
Bathroom:
YES we have a bathroom! We get that question a lot: “Where do you go to the bathroom/shower?” For showering: we have a gym membership so we typically shower there. There are several public showers throughout the country as well. We also have a solar shower we can take a field shower if we had to.
For our bathroom business: We have a small portable toilet that fits under our bed and take it out when necessary. If we are parked for a few days; the toilet goes outside and gets used whenever necessary… We have a small privacy tent that we put over the toilet so it becomes our private porta-pottie.
Yes, we need to empty it every few days if we use it more. To empty it is simple: find a public toilet, pit toilet or porta-pottie and dump the content in the toilet. Yes, it can be a stinky job but who cares. We may be backpackers but having the convenience of that toilet is great! (At least, for me it is)
Work Desks:
We’re fortunate enough to both have the ability to work remotely. We do have to work a regular work week from Monday to Friday so for us, having dedicated work desks was essential. One thing that helped tremendously was having both seats swivel. Now those seats become our computer chairs. Bryan’s got a permanent table we can use as additional counter space when he’s not working. My desk is a simple Lagun Table Mount that can be remove to give us more van space. I often end up working sitting in bed but it is nice to have the option to sit up properly.
Other modifications:
When we purchased the van, it had no windows. Last year, we had rear windows installed but we always wanted to add another one in the sliding door. Not only would it let in more natural light in, it was also a huge pain not to be able to check our blind spot when driving.
I was too worried about cutting holes in the van roof and wall that I reached out to Raynor from RayOutfitted to help me with the daunting task! He’s fellow vanlifer who’s goal is to help other DYI’er realize their dream van! He installed the bull bar, the sliding door window and the roof fan.
With the ventilated window and fan installed, hot days are bearable in the van. We have a fan that can pull in fresh air or suck out hot air from the van.
Misc Items:
Window covers: I sew insulated window covers for all of our windows and fan vent. It helps with privacy and helps cool or retain the heat in the van.
Water: We don’t have a sophisticated water system for Van 2.0. We store a 7Gallon Aquatainer under the bed to refill our 2.5 gallon jug with spout in the kitchen. Perhaps in the next build we’ll have water tank and sink system.
Cooking: We opted for a single burner this time around. Because of our electrical capability is great, we may replace our propane stove for an induction/electric stove soon. This way, we won’t need to store propane tanks in the van.
Clothes Storage: We loved the lift up counter we had in build 1.0. We recreated the concept and now have our own clothes storage on each side of the bed.
Insulation: While having SOME insulation was good, I didn’t go crazy with it. A few sheets of foam board and some spray foam was good enough for us. Since we don’t plan on spending much time in cold areas, insulation was not a major requirement for us. In case of cold weather days, we have a Mr. Buddy Heater and our cold weather sleeping bags. Because our house is on wheels; we can chase the sunshine!
So what does the van look like now? Something like this:

Van 2.0 Interior
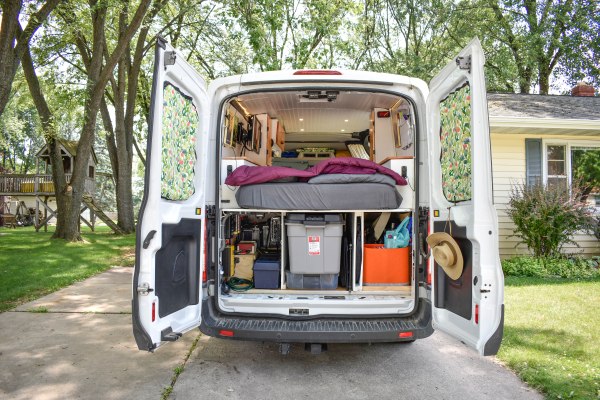
Van 2.0 Storage

Lots of juice to keep us going for daaaaaaays!

very nice build but I bet it is a hassle to drag things out as you need, but I guess as long as your not working full time and have the energy and time that is not a problem. sometimes I have to drag things out of the cuboard to use and then put it away after I clean it. lol
LikeLike
Thank you! Most everyday items are easily accessible and the rest are not that hard to get to. The hardest items are things like tools if we get a flat tire and whatnot… so hopefully we never need them! 🙂
LikeLike
I love it! Will you be bringing 2.0 to Arizona this winter? I want a tour!
LikeLiked by 1 person
Yes! We’ll be back in about 2-3 weeks. Hoping to wrap up our AZT section-hiking by Christmas! 400miles left! We’ll definitely be you at some point 😀
LikeLike
Sounds great, what did you use for the window covers? I still need to make some.
LikeLiked by 1 person
We used some thermal & regular fabric from Joanns (The Craft store) and made our own covers & bought some too.
For the back windows, they’re simply 3 layers of fabric sewn together with magnets to stick on the van’s metal frame: Black on the outside so people can’t see in. (It just looks like our windows are super tinted) The thermal fabric in the middle to reflect some heat and finally on the interior side, we chose a simple motif fabric.
For the front windows, we bought those heatshield sunshades that were our window’s sizes and covered them with the same fabric as the back windows.
LikeLike